BenJ Interaction
BenJ Interaction est un plugin pour Unreal Engine 5 développé en c++ avec les fonctionnalités suivantes :
- Implémentation facile et rapide d'interactions.
- Possibilité de maintenir la touche où de devoir appuyer plusieurs fois pour valider l'interaction.
- Affichage de la UI optimisé avec un seul widget pour toutes les interactions plutôt qu'un widget component pour chaque interaction.
- Possibilité d'avoir plusieurs interactions sur un seul blueprint.
- Liste de conditions pour pouvoir valider une interaction.
- Affichage des touche aussi bien clavier souris que manette, le tout gérer dynamiquement pour passer de l'un à l'autre.
Documentation
1 - Set up du plugin
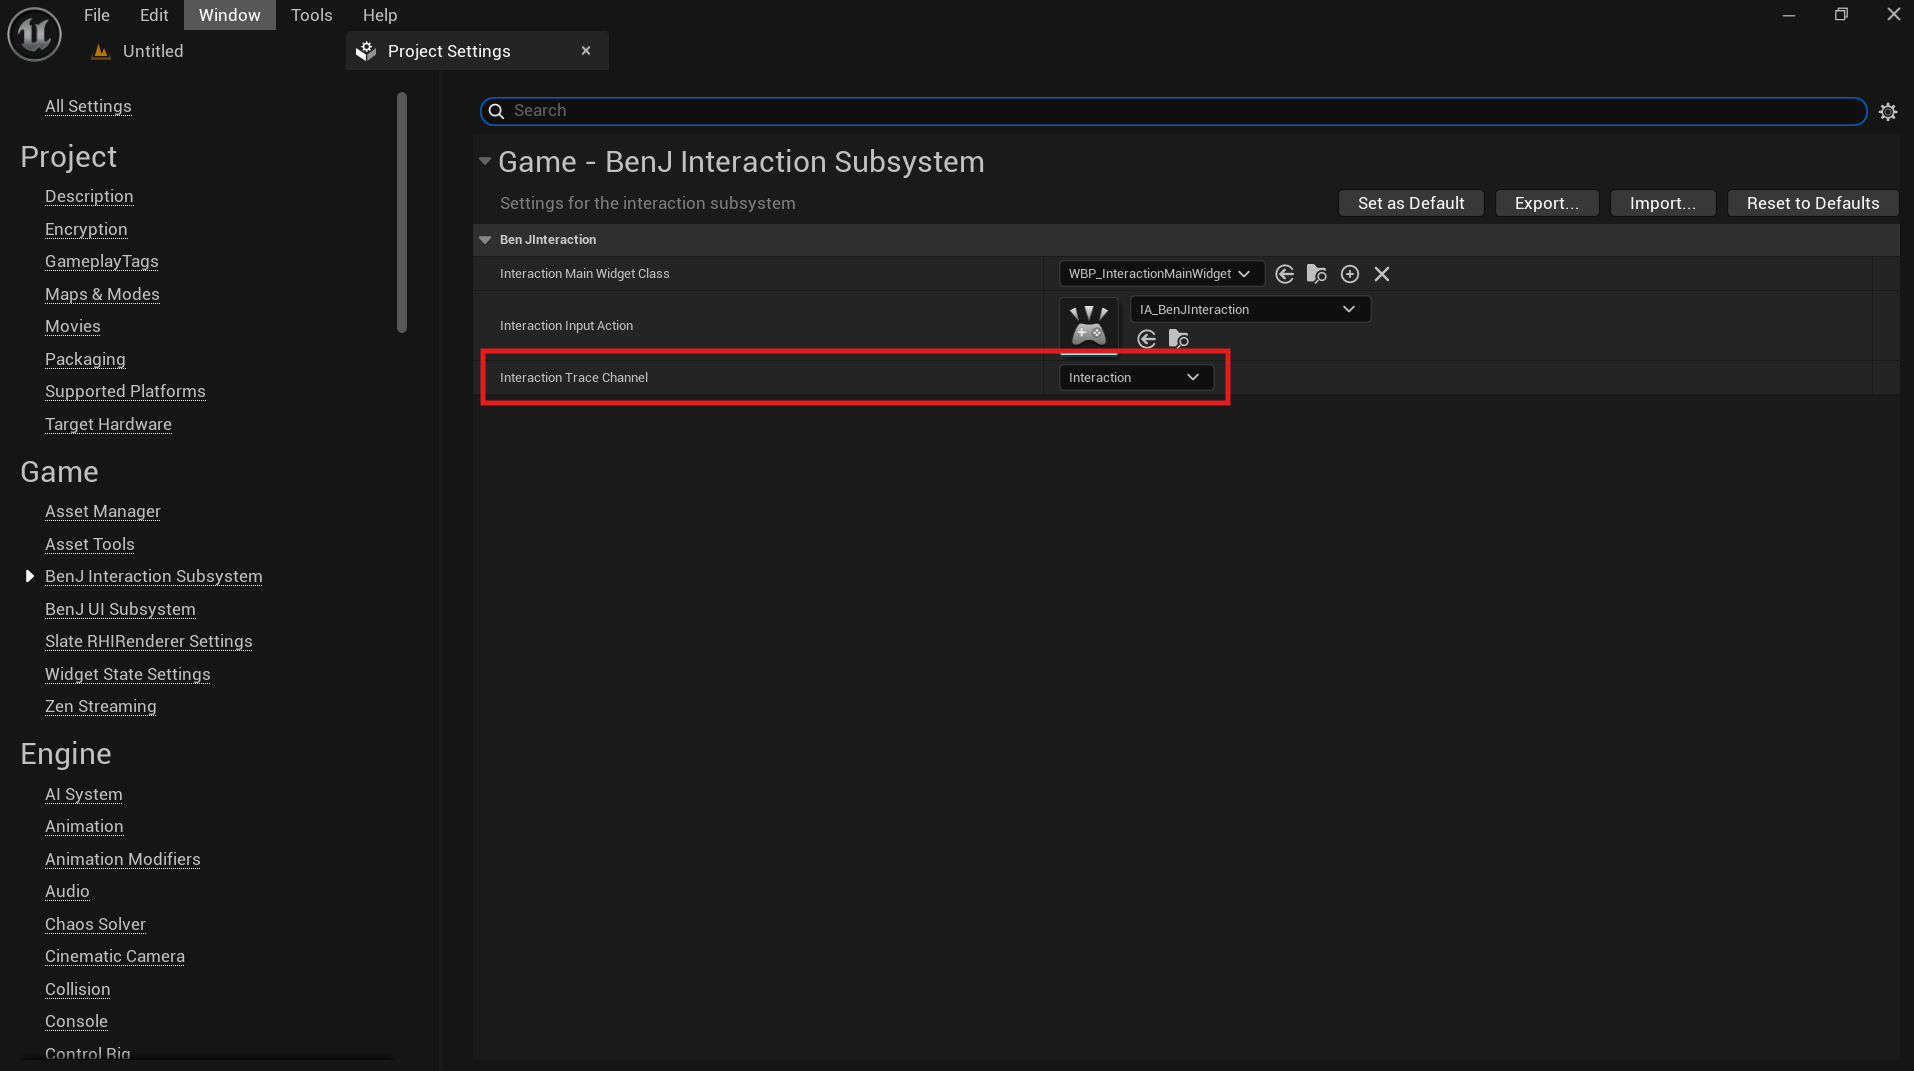
BenJInteraction utilise un système de capsule trace pour détecter les potentielles interactions avec son propre trace channel. Pour commencer, ajouter un trace channel Project Settings->Collision. La réponse par défaut doit être ignore.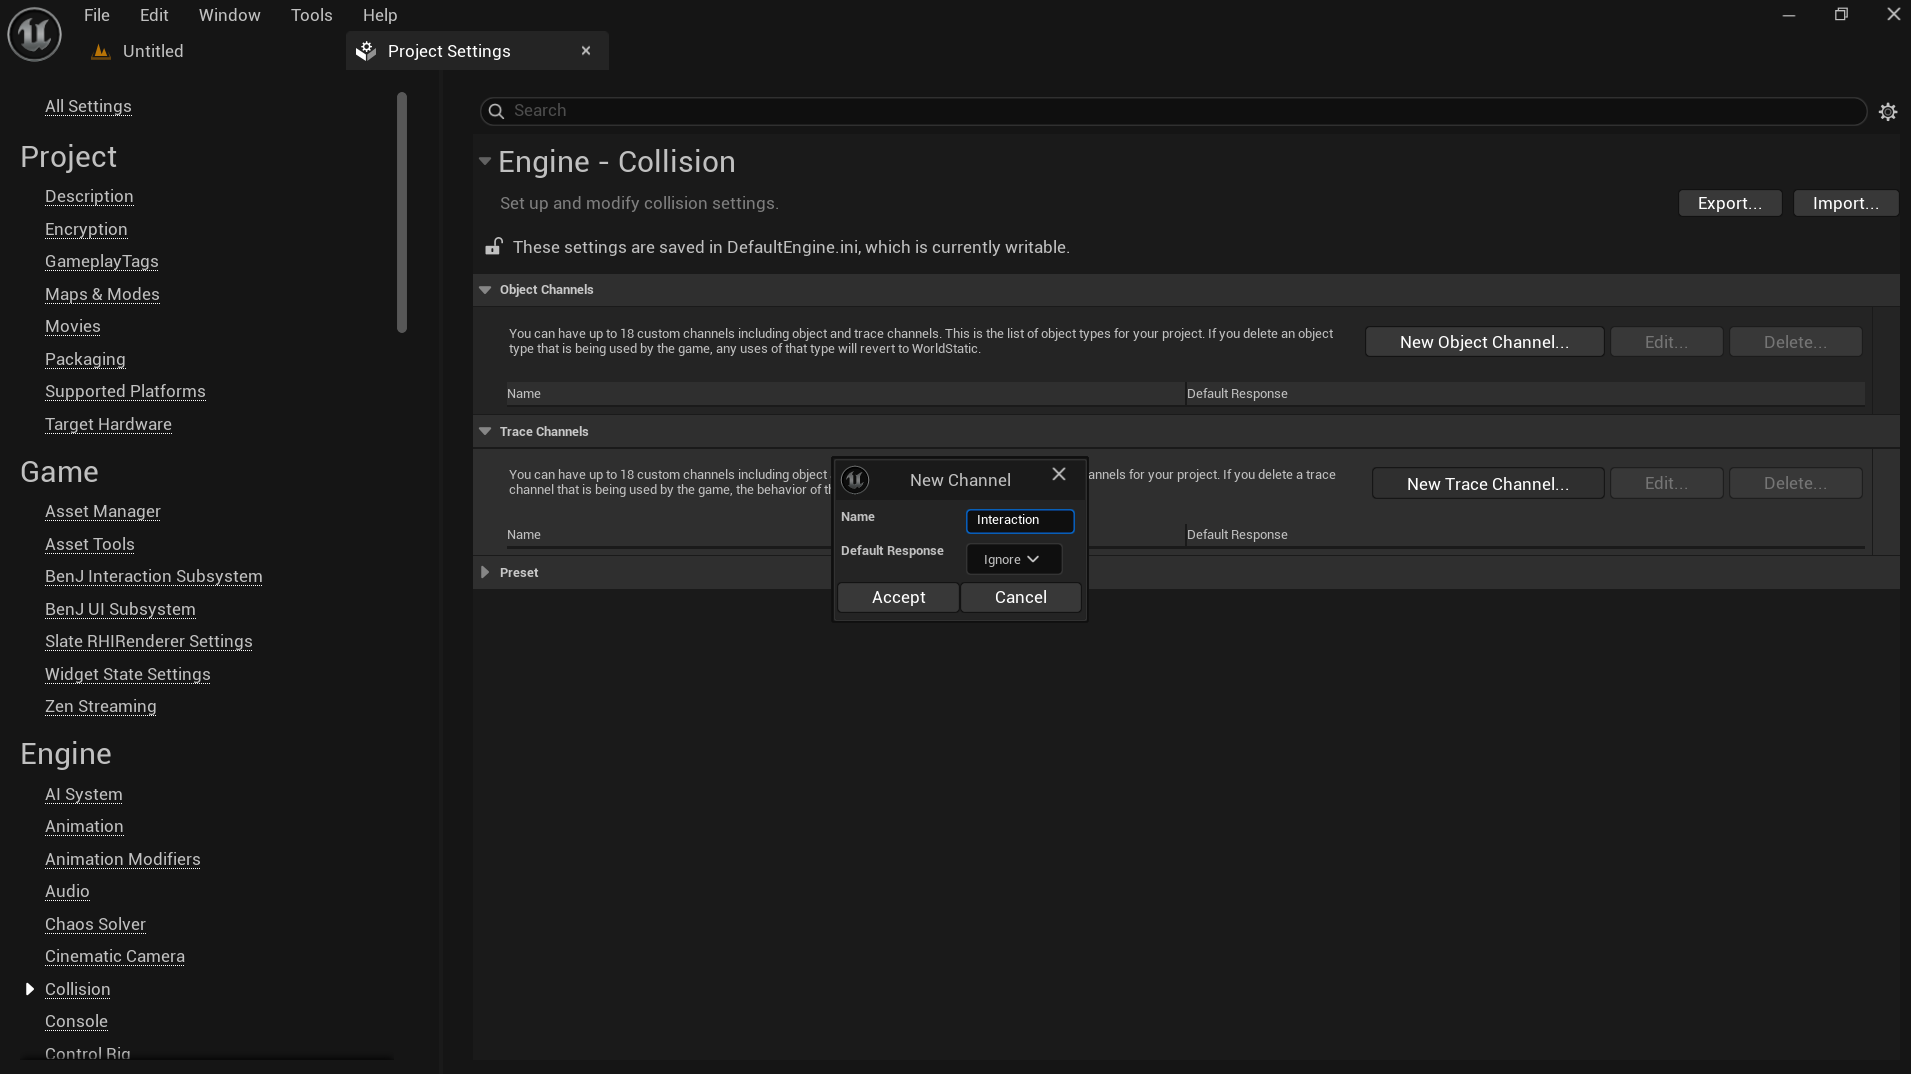 Renseignez ensuite ce channel dans les options du plugin.
 La détection se fait en deux temps. Un capsule trace partant du component holder pour détecter une potentielle interaction. En cas de succès, un line trace sur le trace Visibility vérifie qu'aucun obstacle n'est entre le component holder et l'interaction.
A partir de là, le niveau LVL_Showcase peut être joué.
Si vous avez déjà votre Input Action pour les interactions, renseignez-le également dans les options du plugin. Sinon, utilisez L'input action déjà présent dans le mapping context de votre joueur.
La détection se fait en deux temps. Un capsule trace partant du component holder pour détecter une potentielle interaction. En cas de succès, un line trace sur le trace Visibility vérifie qu'aucun obstacle n'est entre le component holder et l'interaction.
A partir de là, le niveau LVL_Showcase peut être joué.
Si vous avez déjà votre Input Action pour les interactions, renseignez-le également dans les options du plugin. Sinon, utilisez L'input action déjà présent dans le mapping context de votre joueur.
2 - BenJ Interaction holder component
Dans le blueprint de votre joueur, ajoutez le component BenJInteractionHolder, c'est lui qui effectue les capsule trace. Pour finaliser le setup, branchez le à votre input action comme ci-dessous :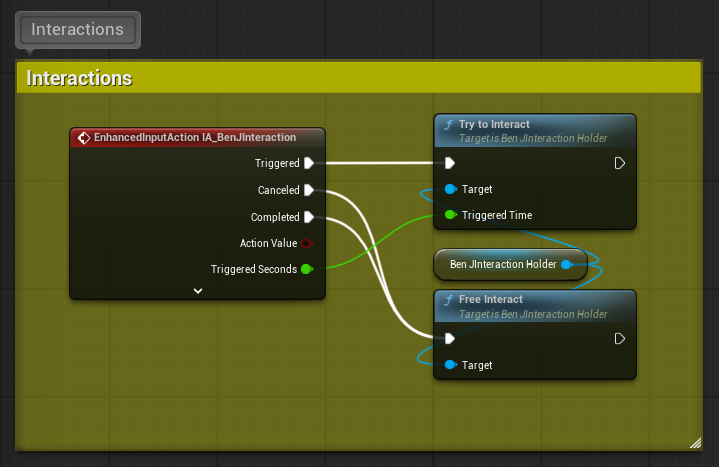
Le component a les options suivantes :
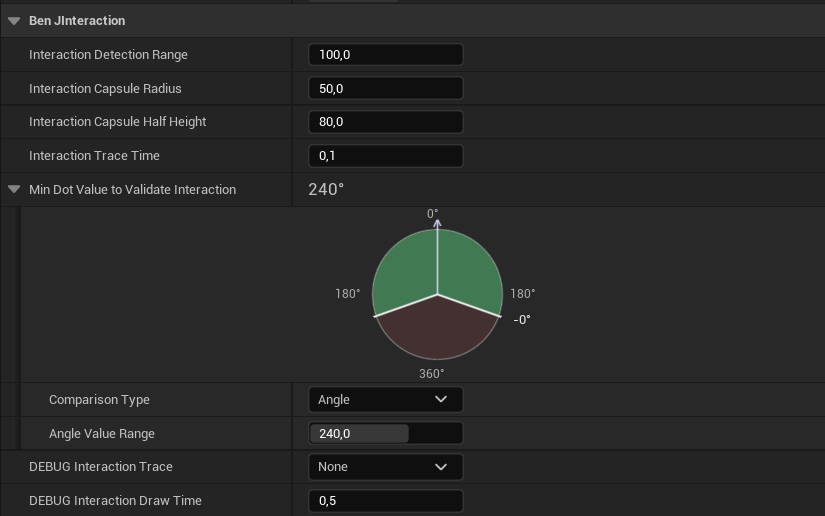
- Interaction Detection Range : Distance max pour détecter une interaction.
- Interaction Capsule Radius : Radius du trace. Plus il est grand, plus un objet pourra être détecté sur les côtés.
- Interaction Capsule Half Height : Semi-hauteur de la capsule. Une hauteur trop petite peut empêcher la détection d'objets au sol tandis qu'une hauteur trop grande peut détecter des objets en l'air.
- Interaction Trace Time : Temps entre deux tentatives de détection. Un temps trop court peut nuir aux perfomances tandis qu'un temps trop long mettra du temps à actualiser les interactions.
- Comparison Type : Angle (de 0 à 360) ou Dot (de -1 à 1). Cette limite est un peu comme un champ de vision pour le joueur, les interactions dans la zone rouge ne seront pas activées. Par exemple pour une interaction derrière le joueur.
- DEBUG Interaction Trace : Affiche le capsule trace et le line trace pour débuger les interactions.
- Debug Interaction Draw Time : Durée d'affichage des trace si DEBUG Interaction Trace est égal à ForDuration.
3 - BPC Interactable component
Le BPC_InteractableComponent est une box de collision qui ne détecte QUE le trace d'interaction renseigné dans les options du plugin. Vous pouvez en mettre autant que vous voulez dans un seul actor.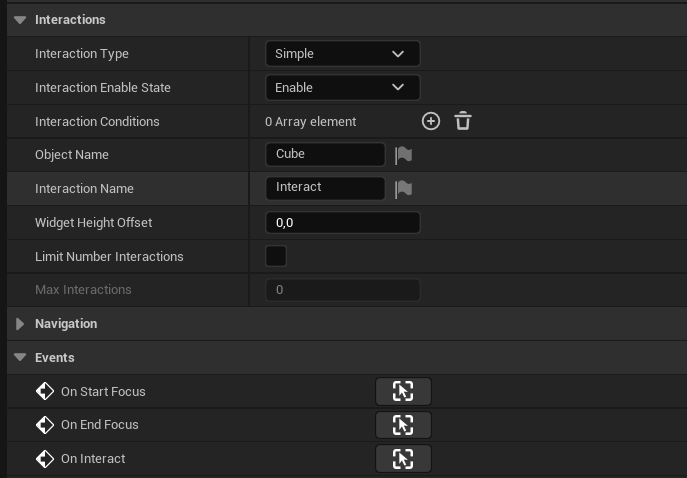
Le component a les options suivantes :
- Interaction Type : Type de l'interaction (Simple, Hold pour maintenir, Tap pour appuyer plusieurs fois) pour la valider.
- Interaction Enable State : Etat de l'interaction. (Enable, Displayable si l'interaction est visible mais ne respecte pas toutes ses conditions et Disabled si elle n'est pas active). Si au début l'interaction est sur disabled elle est désactivé, sinon l'état est automatiquement mis à jour.
- Interaction Conditions : Liste des conditions de l'interaction. Si la liste est vide, elle est toujours executable si elle est Enabled.
- Object Name : Nom de l'object qui sera affiché sur le widget.
- Interaction Name : Nom de l'interaction qui sera affiché sur le widget.
- Widget Height Offset : Décallage en hauteur du widget en world space. Si c'est égal à 0, le widget s'affichera à la position de la box de collision.
- Limit Number Interactions : Si la case est cochée, vous pouvez limiter le nombre d'interactions avant de la désactiver.
- Max Interactions : Nombre maximal d'interactions avant de la désactiver.
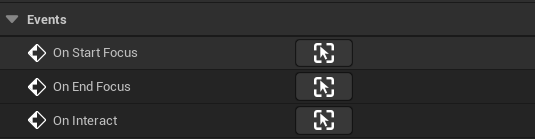
Le component peu utiliser les events suivants :
- OnStartFocus : L'event est appelé au moment où le joueur commence à focus l'interaction, c'est à dire quand elle commence à être affichée.
- OnEndFocus : L'event est appelé au moment où le joueur arrête de focus l'interaction, c'est à dire quand elle arrête d'être affichée.
- OnInteract : L'event est appelé quand l'interaction est validée.
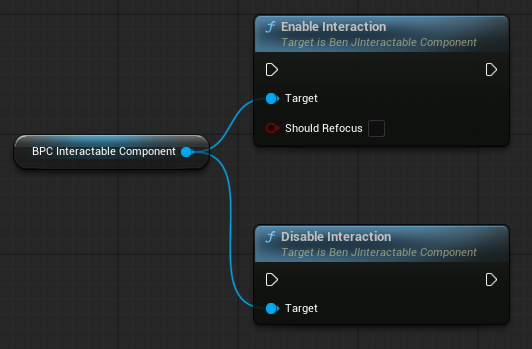
Le component implémente les fonctions suivants :
- EnableInteraction : Active l'interaction, le joueur peut à nouveau la voir. Si ShouldRefocus est coché le joueur va focus cette interaction et (donc avoir la UI dessus et pouvoir l'exécuter).
- DisableInteraction : Désactive l'interaction, elle arrête donc d'être affichée.
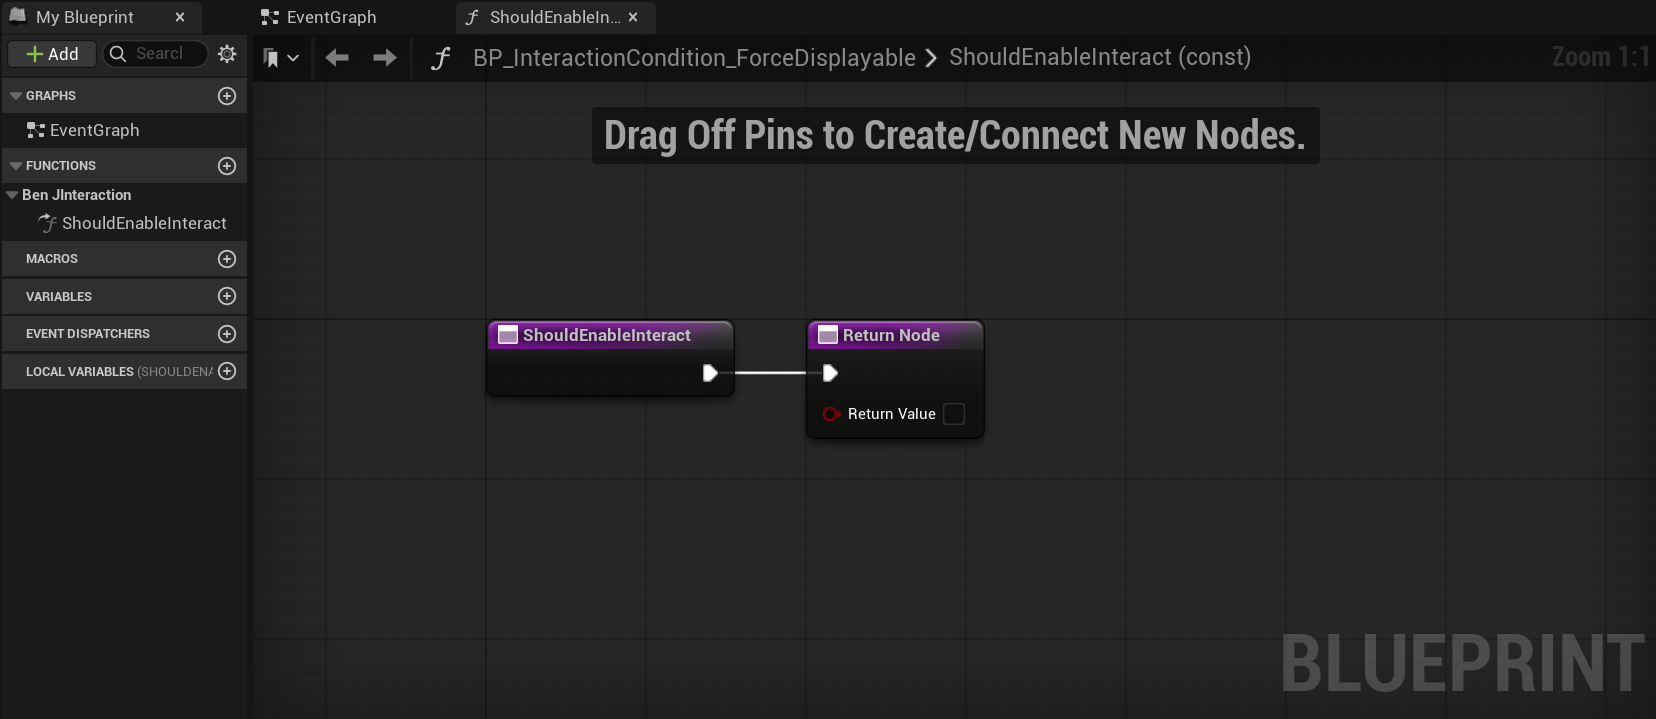
4 - Interaction condition
Pour créer une condition, cherchez BenJInteractionCondition quand vous créez un nouveau blueprint.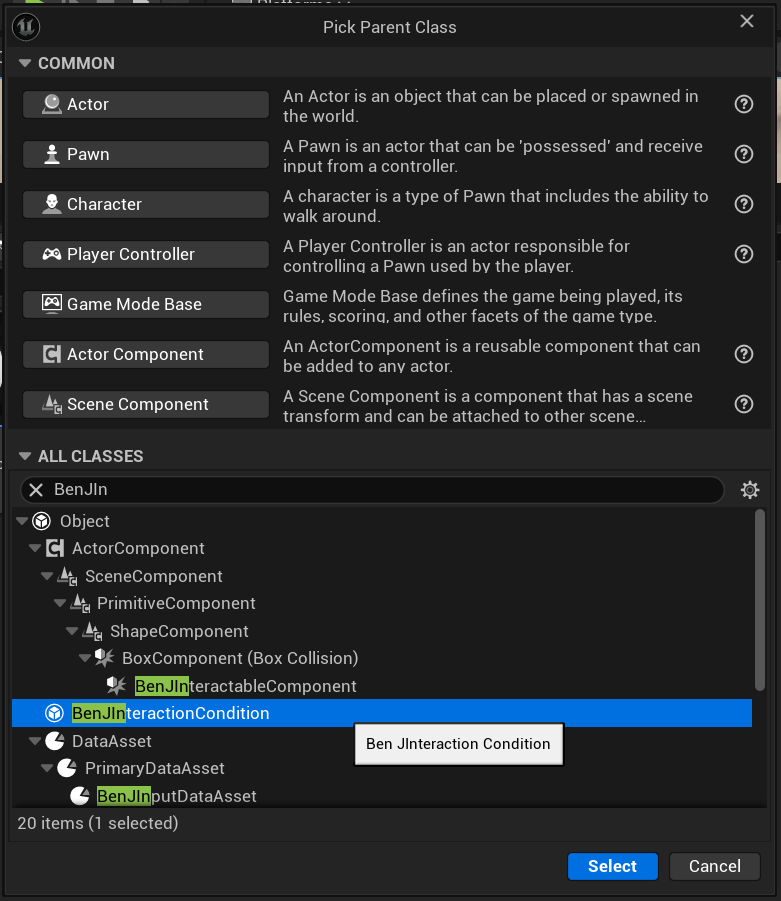 Chaque condition possède une fonction ShouldEnableInteract. Si au moins une des conditions d'une interaction renvoie faux, alors l'interaction sera grisée et ne pourra pas être executée. Cela peut être utile pour des condition en fonction d'une statistique ou d'un inventaire.
5 - UI
Le plugin ne crée qu'un seul widget, héritant de la classe BenJInteractionMainWidget, que vous pouvez rensigner dans les options du plugin.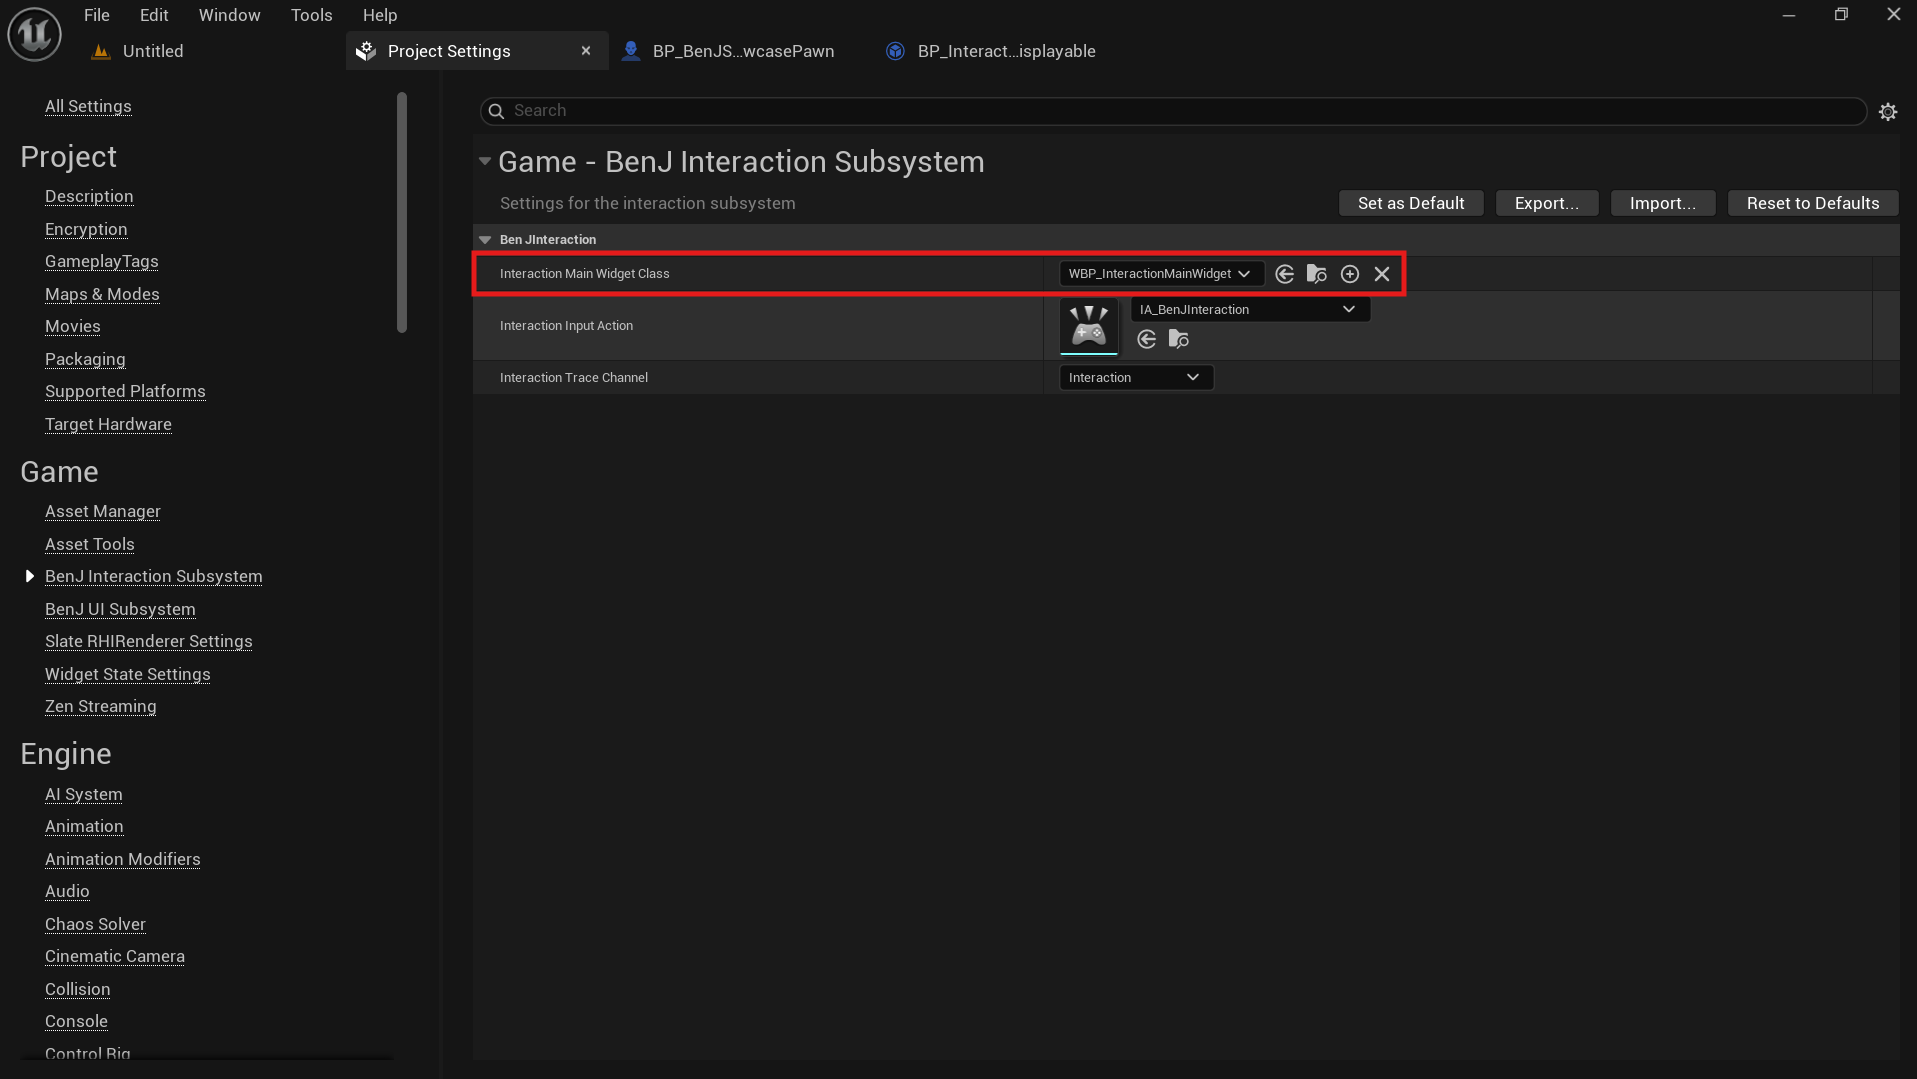 Ce widget contient le widget d'interaction, le WBP_InteractionWidget qui va afficher les informations des interactions (Nom de l'objet, nom de l'interaction, icone de l'input).
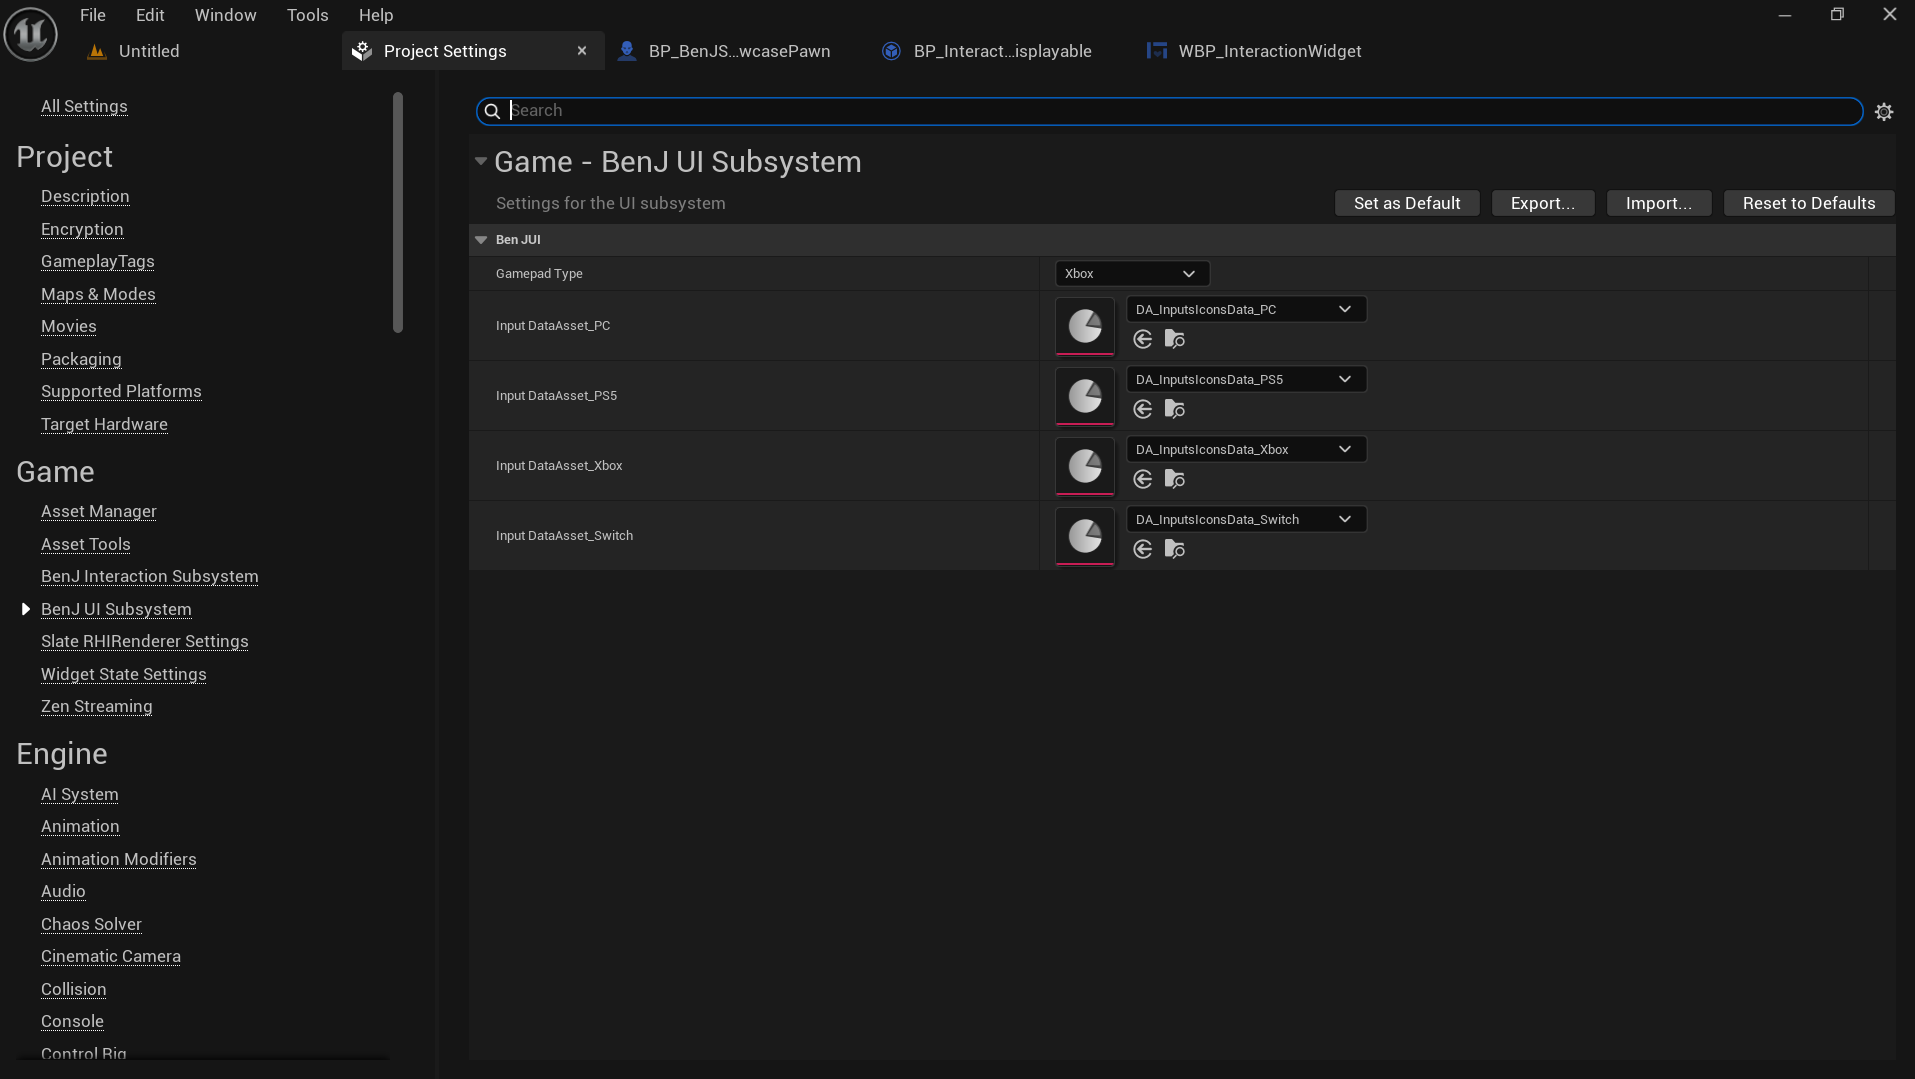
L'icone de l'input est gérée automatiquement par le BenJUISubsystem. Les icones sont rangées dans des data asset, un par type de controller.
Ce widget contient le widget d'interaction, le WBP_InteractionWidget qui va afficher les informations des interactions (Nom de l'objet, nom de l'interaction, icone de l'input).
L'icone de l'input est gérée automatiquement par le BenJUISubsystem. Les icones sont rangées dans des data asset, un par type de controller.
 Le widget d'input cherche à quelle touche correspond l'input action des interactions dans le mapping context du joueur et y associe l'icone correspondante en fonction de si le joueur utilise une manette ou non.
BenJ Interaction
BenJ Interaction is a plugin for Unreal Engine 5 developed in C++ with the following features:
- Easy and fast implementation of interactions.
- Ability to hold the key or press it multiple times to validate the interaction.
- Optimized UI display using a single widget for all interactions instead of one widget component per interaction.
- Ability to have multiple interactions on a single blueprint.
- List of conditions required to validate an interaction.
- Display of both keyboard/mouse and controller inputs, all handled dynamically to switch from one to the other.
Documentation
1 - Plugin setup
BenJInteraction uses a capsule trace system to detect potential interactions with its own trace channel. To begin, add a trace channel in Project Settings->Collision. The default response must be ignore.
Then fill in this channel in the plugin options.
Detection works in two steps. A capsule trace starting from the holder component detects a potential interaction. If successful, a line trace using the Visibility trace checks that no obstacle is between the holder component and the interaction.
From there, the LVL_Showcase level can be played.
If you already have your Input Action for interactions, also assign it in the plugin options. Otherwise, use the Input Action already present in your player's mapping context.
2 - BenJ Interaction holder component
In your player's blueprint, add the BenJInteractionHolder component, which performs the capsule traces. To complete the setup, connect it to your input action as shown below:
The component has the following options:
- Interaction Detection Range: Maximum distance to detect an interaction.
- Interaction Capsule Radius: Radius of the trace. The larger it is, the more objects can be detected on the sides.
- Interaction Capsule Half Height: Half-height of the capsule. A height that is too small may prevent detection of objects on the ground, while a height that is too large may detect objects in the air.
- Interaction Trace Time: Time between two detection attempts. A value too short may hurt performance, while a value too long will delay interaction updates.
- Comparison Type: Angle (from 0 to 360) or Dot (from -1 to 1). This limit acts like a field of view for the player; interactions in the red area will not be activated. For example, an interaction behind the player.
- DEBUG Interaction Trace: Displays the capsule trace and line trace to debug interactions.
- Debug Interaction Draw Time: Display duration of the traces if DEBUG Interaction Trace is set to ForDuration.
3 - BPC Interactable component
The BPC_InteractableComponent is a collision box that ONLY detects the interaction trace specified in the plugin options. You can add as many as you want in a single actor.
The component has the following options:
- Interaction Type: Type of interaction (Simple, Hold to hold the key, Tap to press multiple times) required to validate it.
- Interaction Enable State: State of the interaction. (Enable, Displayable if the interaction is visible but does not meet all its conditions, and Disabled if it is inactive). If the interaction starts as disabled, it remains disabled; otherwise, the state is updated automatically.
- Interaction Conditions: List of interaction conditions. If the list is empty, the interaction is always executable as long as it is Enabled.
- Object Name: Name of the object that will be displayed on the widget.
- Interaction Name: Name of the interaction that will be displayed on the widget.
- Widget Height Offset: Height offset of the widget in world space. If set to 0, the widget will appear at the collision box position.
- Limit Number Interactions: If checked, you can limit the number of interactions before disabling it.
- Max Interactions: Maximum number of interactions before disabling it.
The component can use the following events:
- OnStartFocus: Event called when the player starts focusing the interaction, meaning when it starts being displayed.
- OnEndFocus: Event called when the player stops focusing the interaction, meaning when it stops being displayed.
- OnInteract: Event called when the interaction is validated.
The component implements the following functions:
- EnableInteraction: Activate the interaction, the player Can see it again. If ShouldRefocus is ticked, the player will focus the interaction (the widget will appear and the player can execute the interaction).
- DisableInteraction: Disable the interaction, it doesn't appear anymore.
4 - Interaction condition
To create a condition, search for BenJInteractionCondition when creating a new blueprint.
Each condition has a ShouldEnableInteract function. If at least one condition of an interaction returns false, the interaction will be grayed out and cannot be executed. This can be useful for conditions based on a stat or an inventory.
5 - UI
The plugin only creates a single widget inheriting from the BenJInteractionMainWidget class, which you can assign in the plugin options.
This widget contains the interaction widget, the WBP_InteractionWidget, which displays interaction information (object name, interaction name, input icon).
The input icon is automatically managed by the BenJUISubsystem. Icons are stored in data assets, one for each controller type.
The input widget checks which key is assigned to the interaction input action in the player's mapping context and associates the corresponding icon depending on whether the player is using a controller or not.